Saturday, December 31, 2011

It's A New Years Challenge

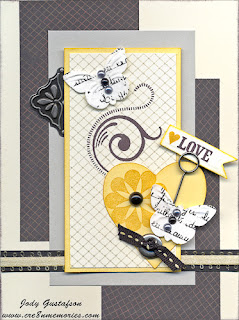
Challenge # 4 at Inspired By is to create a project using the New Years Invitation below.

 Colors: Black, Grey Flannel, Buttercup and Honey. Card Design is from Jeanette Lynton's Originals.
Stamp set it the new Rock the Block stamp set.
Use this invitation to create your project and post at Laurel's Inspired by Challenge blog.

Rock the Block Celebrates

National Paper Crafting Month

 New Years Day
 Valentines Day
 Easter Sunday
 Mother's Day
 Father's Day

Get an exclusive E-size stamp set and the My Creations® Collage Cubes
for just $15 with your qualifying purchase


JOIN THE CRAZE! WHEN YOU PLACE A MINIMUM ORDER OF $25 FROM THE
Autumn/Winter 2011 Idea Book, you can get two new products for just $15: the
My Creations® Collage Cubes (a Spring/Summer 2012 sneak-peek product!) and
the exclusive My Acrylix® Rock the Block E-size stamp set. That’s a retail savings
of almost $30! You're going to love the Collage Cubes and the Rock the Block
stamp set, which work together for interactive, 3-D fun.

Friday, December 16, 2011

For the New Year

2012 Desk Calendar

 Embellish your desk with this easy to make 4.5 X 4.5 desk calendar. Attach calendar with removable adhesive for an easy change for 2013. Can be mailed as a card or wrapped as a gift.

Directions for 4.5 X 4.5 Desk Calendar: Cut cardstock 12 X 4.5. Score at 1", 2", 6.5", and 11". Fold on all score lines. Attach the bottom together to make a tent card stand. Use a card design from Wishes to  create the front. Add calendar and embellish as desired.

CTMH Supplies:
BTP: Sonoma
Cardstock: Gypsy
Ink: gypsy
Stamps: Hooray Bouquet, Authentic
Embellishments: Heirloom Assortment, Opaques
Other: Seam Binding Ribbon, Calendar

A Challenge and a Dare

Diana's Stamping Challenges has another challenge along with another color dare!!
This weeks challenge is to use the colors Pear, Parchment, Sunset, and Black to create a Christmas card. These are not the normal colors for Christmas but very normal for Halloween. What a dare. Can you take it?

Making the Christmas card was easy, but using the Halloween colors was the real challenge. Then I looked over at our Christmas tree and right there was a bright orange ornament. Inspiration comes in everyday places. So I used the Sunset and Pear colors for the ornaments and accented with the Black and Parchment.
Now I'm with Diana... can't wait to see your project posted at her challenge blog.

CTMH Supplies:
Cardstock: Black, Pear, Parchment
Ink: Pear, sunset, Black
Stamps: Holiday Cheer
Embellishments: Bitty Sparkles
Other: Scrunchy Seam Binding Ribbon

Tuesday, December 13, 2011

Sharing From the Heart Blog Hop

Merry Christmas to you and Blessings in the New Year

If you have come from Wendy's Scrapbooking Blog you are on the right path. For my project I made a Christmas card and a New Years Card. I chose my favorite Christmas color combination: Olive, Sweet Leaf, and Cranberry

 "Pearfect" wishes to you this Christmas season

And the "grandest" of  all New Years.

Each year I send New Years cards to all who sent me a Christmas Card with a New Years note. Christmas Blessings to you and much Joy in the new Year! Thanks for stopping by. Now it's time to hop over to Lori's Happy Life for some magical Christmas inspiration.

CTMH Supplies:
BTP: Believe, Wings
Cardstock: Colonial White, Cranberry, Olive, Sweet Leaf
Stamps: Mayberry, Hooray Bouquet
Ink: Cranberry, Sweet Leaf, Olive
Embellishments: Red Brad Assortment, Green Button Assortment
Other: Seam Binding Ribbon, Safety Pin

Sunday, December 11, 2011

Holiday Wishes to You From Heart 2 Heart

 Since it is the last challenge of the 2011, you will be able to play along right past New Year's Day! We're calling it a Virtual Holiday Card Exchange and here's all you have to do: post any holiday card you created using Close To My Heart products at Heart 2 Heart.  Wish everyone who stops by your blog a very Merry Christmas, Happy Hanukkah, Happy Kwanzaa or whatever you celebrate this season!! You can click on my Christmas Card and it will take right to our Virtual Holiday Card Exchange to post your Holiday wish.

Merry Christmas to all who have come to Heart 2 Heart this year for inspiration or a creative challenge. May the Lord fill your hearts, homes, and lives with blessings that are more than you can imagine. Wishing you also the happiest of all New Years filled with more Love and Joy each day. Looking forward to seeing you all back in 2012 because we all love a good challenge.

CTMH Supplies:
BTP: Believe
Cardstock: Colonial White, Olive, Cranberry
Ink: Cranberry, Olive
Stamps: Christmas Love
Embellishments: Holiday Mini Medley(Discounted on my website), Green button Assortment
Other: Seam Binding Ribbon, Bakers Twine

Wednesday, December 7, 2011

Embossing Fun

I ran into some embossing folders I purchased last year and decided to play. This is a simple card to make. Just emboss the white daisy card front, add your "JOY" letters and "to the World" under a White ribbon.

Pop your letters and add a few mini sparkles for some bling.  Simple, elegant, and full of Christmas spirit.

CTMH Supplies:
Cardstock: White Daisy
Ink: Twilight
Stamps: Token Alphabet, Tiny Typewriter Alphabet
Embellishments: Mini Sparkles
Other: Ribbon

Scraps R Us

Using those 1" strips that seem to multiply and tend to pile up.

 Choose three colors. I chose Cranberry, Sweet Leaf, and Olive. Gather all your 1" scraps of BTP, colored cardstock and white daisy or colonial white cardstock. Choose two BTP of different colors. Choose a colored cardstock. Stamp the three colors on your white daisy or colonial white cardstock. You can random stamp or stamp a design using a border stamp. Layer your strips, create a focal point and embellish.
Make a side border using cardstock. Emboss your colored cardstock and sand to expose the white core. Stamp your white daisy or colonial white using a border stamp and your three colors. Add your focal point and a sentiment and embellish as desired. 

CTMH Supplies:
BTP: Mayberry, Believe, Wings
Cardstock: Colonial White, Cranberry, Olive
Ink: Cranberry, Olive, Sweet Leaf
Stamps: Mayberry
Embellishments: Red & Green Button Assortment
Other: Seam Binding Ribbon, safety pin
Monday, December 5, 2011

Candy Cards

Use a candy surprise to embellish a card.

 Make a sucker cover and add it to the front of your card. 
 Make a matchbook and insert a candy surprise.
Inside matchbook holds two candy cane lifesavers.

CTMH Supplies:
BTP: Believe, Sofia
Cardstock: Holiday Red, Pear, Topiary
Ink: Holiday Red, Pear, Topiary
Stamps: Holiday Cheer, Just for the Holidays, Share the Magic
Other: Assorted ribbon from stash, bakers twine, sucker, lifesavers

Sunday, December 4, 2011

There's Inspiration Going on at Heart 2 Heart

This week at Heart 2 Heart we are working with this inspiration photo. Lots to see: polka dots, colors, circle shapes, ribbons, twiggy wreath, ornaments, etc. What will inspire you in this photo this week? 


I decided to make some ornaments using the colors Holiday Red and Pear. I also added buttons, the polka dot BTP from Sofia and  ribbons from my stash. So, what inspires you? Lets see your creations at Heart 2 Heart this week as we wind down our Heart 2 Heart Challenge year.

CTMH Supplies:
BTP: Sofia
Cardstock: Holiday Red, White Daisy
Ink: Holiday Red, Pear
Stamps: Snow Flurries
Embellishments: Ornament Dimensional Elements, red sparkles, Pear Mini Medley
Other: Ribbons from my stash, gold string

Wednesday, November 30, 2011

Shopping List Stocking Stuffers

Easy to Make Covered Shopping List


Purchase some tablets and have them cut in half. Cover the front of the tablets as desired.
The "shopping list" stamp is a customized stamp K900.  I used "Upright" and "Vertical Three" from Originals and "Simply Said" and "Top Band" from Wishes for my designs.

Tuesday, November 29, 2011

A "Holiday Wishes" Collection

With some wonderful inspiration from Pamela O'Connor, one of our Design Team members at Heart 2 Heart I put this collection together using her color combo and techniques. My workshop for this collection will be on Saturday December 10 at 10 AM. Cost:$10.00.  RSVP by December 8th to reserve your spot. If you can't attend you can reserve your The Holiday Wishes Collection Kit.


You can qualify to own this exclusive stamp set when you place a minimum order of $25 in My Acrylix® stamp sets* between November 1–30 and the new D-size Holiday Wishes stamp will cost you $5.00! Tomorrow is the last day for this special. Don't miss out, order today.


Make your wish come true with this exclusive stamp set at an incredible discount.

Sunday, November 27, 2011

Sketch Week at Heart 2 Heart

At Heart 2 Heart this week is a sketch sketch challenge. For my project I made a box of all occasion cards using the Salutation Seals Stamps Set. The stamp set has six seals for creating the six all occasion cards. The cards with envelops are placed in a clear box, wrapped with a ribbon and tag.

 Box of six all occasion cards
 Sketch
 Valentines Day Card
 Thanks you Card
 Time to celebrate
 Congratulations
 Thinking of you card
Happy birthday card

Now it's your turn to put your touch on this sketch. Don't forget to use CTMH products on your project.
I'm looking forward to seeing your creations posted this
week at Heart 2 Heart.

CTMH Supplies:
BTP: Typeset, Mayberry
Cardstock: Colonial white, Black. Vineyard Berry, Olive
Ink: Vineyard Berry, Olive, Black
Stamps: Salutation Seals, Love Life, Made With Love
Embellishments: Opaques, Tag Dimensional Elements
Other: Seam binding ribbon, assorted ribbons from stash

Monday, November 21, 2011

Too cute not to CASE

In the words of Vicki,  a "Easy, peasy" Thank You Christmas card cased from

Punch a border on each side and insert a BTP on the inside to show through the punched area. Stamp your wreath and add some holly leaves and a bow. Easy, peasy!

Celebrate Time at Heart 2 Heart

This week at Heart 2 Heart we will take a look at time and create a project that uses the theme "time".  This could include a clock, some numbers, a sentiment using "time," etc.
For my project I made a little mail box filled with Hot cocoa Packets for the kitchen. This way we always know where the hot cocoa is. Flag up when the box is full and flag down when it needs to be filled.

Now it's your turn to share your "Time" with us. Be sure to use some Close to my Heart product on your project and post at Heart 2 Heart for a chance to win some terrific prizes from our sponsors.

CTMH Supplies:
BTP: Elemental
Cardstock: Ponderosa Pine, Cranberry, Colonial White
Stamps: A Sip
Ink: Cranberry, Ponderosa Pine, Cocoa, Desert Sand
Other: Assorted Ribbons, Mail box


Monday, November 14, 2011

A Week of Gratitude at Heart 2 Heart

This week at Heart 2 Heart we are celebrating gifts from your heart to ours. The challenge will be to create something for someone you are grateful for. Tell us what is special about that person and why you created this particular item for them.

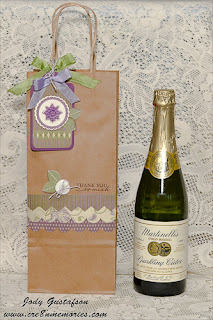
My gift of gratitude goes to my daughter. She is going to be our family Hostess for our Family Thanksgiving gathering.  Her favorite color is purple so I made her this gift bag decked out in purple that will hold her favorite Thanksgiving drink, Sparkling Cider.

This will be a fun week of sharing. Can't wait to hear about everyone's favorite person and see their special creation of gratitude.  Be sure to use some Close to My Heart product and post here at Heart 2 Heart.

CTMH Supplies:
BTP: Sonoma
Cardstock: Smokey Plum
Ink: Smokey Plum
Stamps: Thank You, Love Life
Embellishments: Heirloom Assortment, Colonial White Mini Medley
Other: Wine Bag, Seam Binding Ribbon, Bakers Twine

Sharing From the Heart Blog Hop

Welcome to our November Sharing From the Heart blog Hop. If you have come from Heather's Creative Coconut you are on the right path. Besides the SOTM, we are sharing Thanksgiving and Christmas ideas
My project for this month's hop is a mini pocket planner using the November Stamp of the Month "Cherish the Day."  Every year I make a calender project for my Christmas gifts. This year I'm making these pocket planners. With our new Cricut  Art Philosophy cartridge this project will be quick and easy to make.

Pocket Planner
Inside has a pocket for every two months. The first pocket holds the planning card for January and February
On each side of the pocket is the monthly calendar.
Each pocket hold the planner card with a month on each side. The planner card slides into the pocket.

Thank you for hopping with us. See you next month. Now it time to hop over to Kathleen's Bowl of Stamps for some amazing inspiration.

Directions: Cut out six envelopes from page 29 of the cricut booklet. I used 4" envelopes but you can adjust the size for your needs. Cut 12 tickets for the Stamp of the month tickets for each page.  Fold envelopes, cut off the top flap, and secure together using Bonding Memories Glue. Add scraps of BTP to each side of the envelope as desired leaving the top open to insert the planner card.  Attach your calendar and embellishments to each side of the envelopes. To make the front and back cut a piece of cardstock 4X8 and fold in half. Secure the folded piece together with bonding memories glue. Decorate and embellish as desired. If you don't have a Bind-It-All you can put your planner together with 3 loose-leaf rings.  Click on Picture tutorial to view tutorial.
CTMH Supplies:
BTP: Roxie
Cardstock: Roxie Level II
Ink: Smoothie, Black
Stamps: November SOTM
Embellishments: Bling Assortment, Opaques, Pink Button Assortment
Other: Various Ribbons

Monday, November 7, 2011

It's Metal Mania at Heart 2 Heart

The challenge this week at Heart 2 Heart is to add metal to your project. That can be hard to do with all the options we have for the use of metal. Which metal to use? Brads, eyelets, hinges, pins, Mini Medleys, charms, photo hangers, etc. The list goes on. I put all my metal on the table, closed my eyes and picked two pieces.
A pewter bookplate and an antique copper filigree butterfly.  To get my bookplate to look like antique copper (to coordinate) I used the brown StazOn ink pad to color the bookplate. Yea, now they both look like antique copper. Time to put the card together.

Now it's your turn to pick some metal and add it to your project. I can't wait to see all the metal works this week. I will be fun. Don't forget to use some Close to My Heart product on your project and post for us at Heart 2 Heart. You could win a great prize from one of our sponsors Wendy or Teri.

CTMH Supplies:
BTP: Sonoma
Cardstock: Colonial White
Ink: Cocoa
Stamps: Thank You, Sweet Moments
Embellishments: Pewter Bookplates, Opaques, Bliss filigree butterfly
Other: Handmade Flower

Thursday, November 3, 2011

A Holiday Gift Card Includes Chocolate

Add this door hanger on the door of someone special or hang it on a bow of a package.

 Cut door hanger on page 25 of cricut booklet 10".
Decorate and fill with Hershey Bar and gift card holder.

Gift card holder. Tutorial Here.